As an Amazon Associate I earn from qualifying purchases.
Strollers are widely used for babies to ride, and it is also convenient for parents. Strollers are helpful in many ways, but fixed counterparts cause issues like fixed handles. Though many modern strollers come with height-adjustable handles, a few have fixed ones. Mostly, you can find fixed handles in affordable strollers.
Fixed handles create lots of problems for tall or short parents. They feel uncomfortable while pushing the strollers. The taller parents need to bend when jogging or walking. As time goes by, this habit can cause serious back problems. To get rid of this discomfort, you can use a stroller handlebar extender.
Stroller extenders are excellent accessories that allow you to adjust the comfortable height. However, you can get commercial stroller handle extenders. But there are a few parents who look for the DIY process for this extension. So we have conveyed the simple way to extend the stroller handle.
How To Extend Stroller Handle?
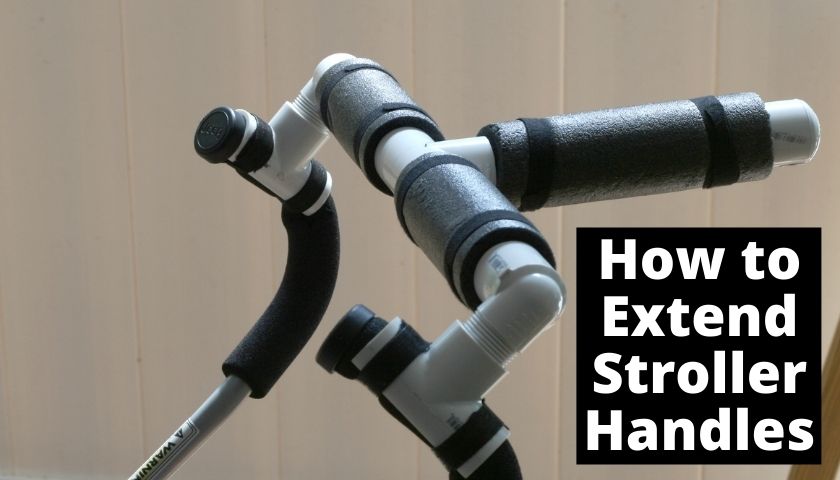
Creating a DIY stroller handle is something you can make at less cost. You can design the extenders as you want, two-handed or one-handed. Ensure the accessory is easy to disassemble as it should not impact the stroller’s portability.
Material
To make an extender, you require some tools and materials. The main element is the PVC pipe, but they come in various diameters. So you need to check and determine which one fits your stroller. The list of the necessary elements is right below:
- 3/4 PVC 5′
- 3/4 PVC Cap
- 3/4 PVC Snap Tee
- 3/4 PVC Tee
- 3/4 Self Seal foam pipe insulation
- 3/4 PVC Threaded/Slip Elbow
- Velcro Ties
- PVC Cement
Instruction
Step 1: Handle Base
Firstly, slip the snap tees onto the stroller handles. The snap tees should fit snugly and position them in your comfort. You can always re-position them as they are made to slip on and off. Tightly wrap the ends of the snap tees with velcro ties. It holds the snap tees in place and prevents wearing out if any tension is applied.
Now, screw them in the elbows. You should screw them as tightly as you can. As you give it a few turns, it will fit tightly and get harder to turn. Open the ends of the elbow so that they point towards each other. Make sure they are positioned correctly.
Step 2: First Handle
Take your pipe and lay down across the elbows of the base. Set the pipe and mark a point for cutting. While marking, make sure you have enough pipe to join the elbows. Keep in mind that some pipe needs to go inside the elbows and it should be at least a half-inch on either side.
Cut the pipe using your hacksaw and cut according to your marks. Give a clean cut and remove all the burrs. Then insert it into the elbows.
Step 3: Adding Insulation
Though the first handle won’t be so comfy, you can add pipe insulation for a comfortable grip. So measure the insulation according to your pipe. Place it on the handle and the ends should rest against the edge of the elbows. Wrap the insulation around the handle and remove the cellophane. Join the sides of the insulation to form a tube.
But leaving the insulation like that won’t last long. The harsh element causes the seam to separate. So use velcro ties to secure the insulation on the handle. Give a tie close to either end. It doesn’t require a tight fit, just enough to hold the seam from pulling apart. Now, the extended handle is ready to use.
Step 4: Additional Handle
You can add an additional handle that makes your steering easier. It is also easy to install. Mark the center of the handle, lengthwise. You can use a tape measure here and make a close to the center.
Now, lay a tee up on the center mark and point out the two elbow marks of the tee. Also, cut some extra pipes that will reside in the tee. Cut the pipe at the marks. You can see a one-inch gap between two pieces of the pipe.
Now, install the tee between two pieces of the pipe. Grip the pipe with the handles. You can adjust your grip and comfort and mark the pipe. Place the cap at the end to give a finished look.
Use a fair quantity of pipe cement to the joints to make sure a good bond and the ends sit well in the tee. Wipe off the excess glue. Add some insulation on the top of the handle for a comfortable grip.
Frequently Asked Questions (FAQs)
How do you fix a stroller handle?
The handle may not be adjustable in cost-effective strollers. So it becomes a problem for the parents. To fix the handle, you can complete a DIY project or buy an extender to enhance the handle.
How do you clean foam handles on strollers?
It is so easy to clean the stroller foam handle. It just requires soapy water, a sponge, and dry towels. First, wipe the handle with soapy water with the cleaning sponge, and then wipe it down with dry towels. It will remove all the soapy residue.
Can I paint the handle?
You can paint the handle with a spray color. It covers the color of the PVC pipe and it will get a finished look. Paint the handle according to your stroller’s color.
Final Thought
A small effort can save you in the long run. The first handle is pretty straightforward. It is like a grasp handle and easy stuff for the walker. And the second handle that points back helps to run the stroller smoothly. Steering is very easy and you can maintain a good distance between the walker and the stroller.
This extra handle is beneficial for tall folks. Creating the handles is very simple and straight. You are required to spend a small amount of money rather than buying an extender.
As an Amazon Associate I earn from qualifying purchases.